
Custom report card templates
Design your school's own report card in a Sheet, a Doc or Excel, add fields for names, scores and remarks, and print it for the classes you choose.
Make report cards look exactly like your school's own. Lay out the card once in Docs & Sheets, or bring it in from Excel, and put a field such as {{student.name}} wherever a student's details belong. The classes you choose print with your layout; every other class keeps the standard report card.
Who can do this: Managers, and staff given Manage School Records.
How fields work
- A field is a name between double curly braces, like
{{student.name}}. When report cards print, each field is replaced with that student's details. - Words around a field print as you typed them:
{{attendance.present}} of {{attendance.total}} daysprints 58 of 61 days. - A row with subject fields, like
{{subject.name}}, prints once for every subject the student takes. - Your formatting prints too: bold text, colors, borders, merged cells and column widths.
Create the template
Open Management, then Docs & sheets, and select New Doc/Sheet.
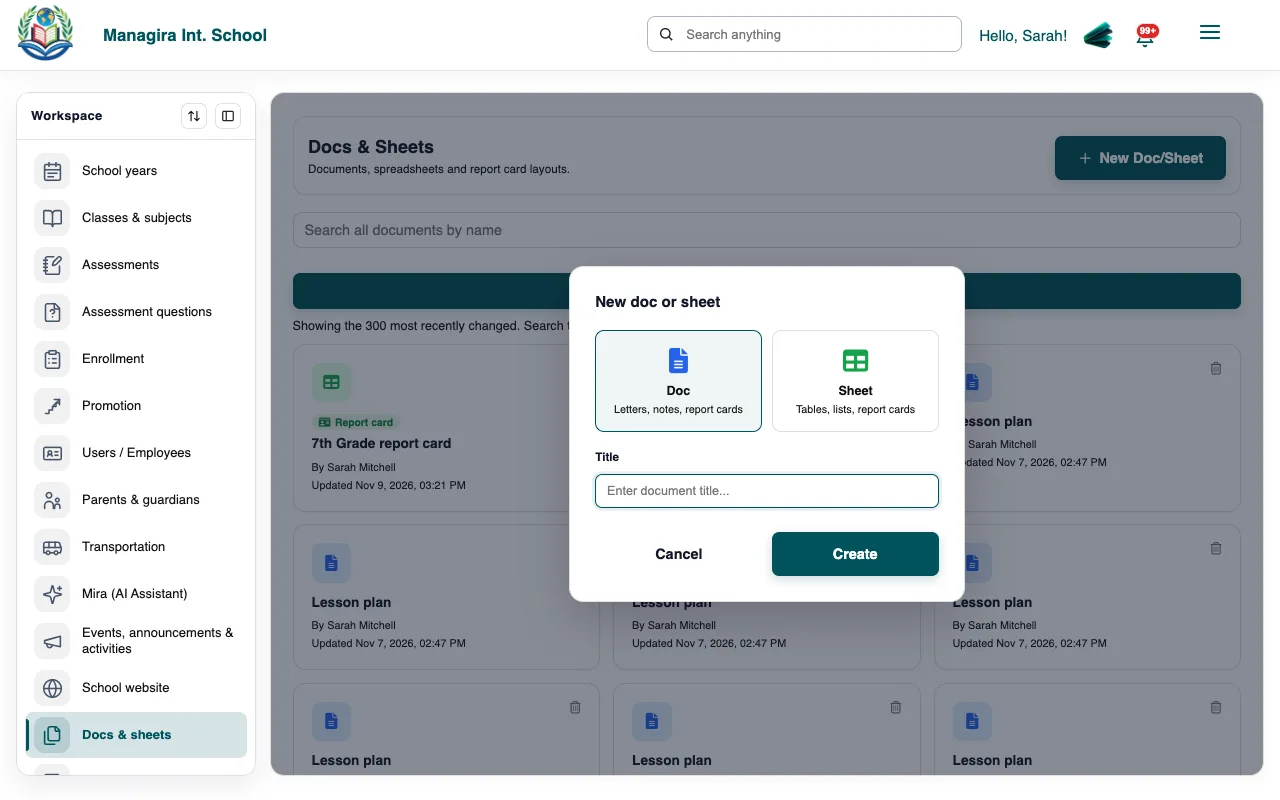
New doc or sheet: choose Sheet for a table layout. Choose Sheet (best for most report cards: rows, columns, borders and merged cells) or Doc (a letter-style card). Name it, for example 7th Grade report card, and select Create.
Lay out the card as you would in a spreadsheet: the school's name at the top, labels in bold, a header row for subjects. Changes save as you go.
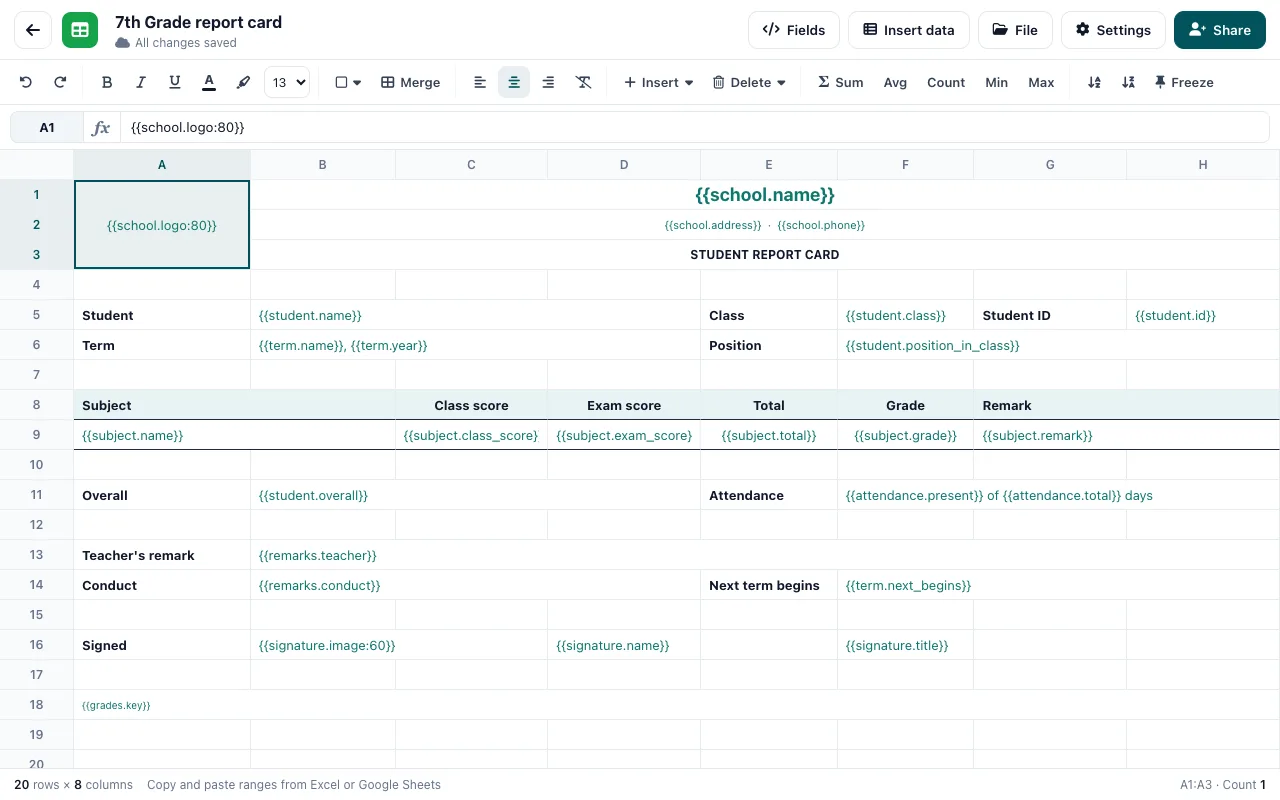
A finished layout: labels in bold, and a field in each cell where data goes.
Tip: Want a head start? Open Fields and, under Start from a sample, choose Scores, Tick boxes or Nursery card for a complete layout you can adjust. Undo brings back what you had.
Bring in your card from Excel
Already have your report card in Excel? Upload it instead of starting over.
In the sheet, open File and select Upload Excel (.xlsx).
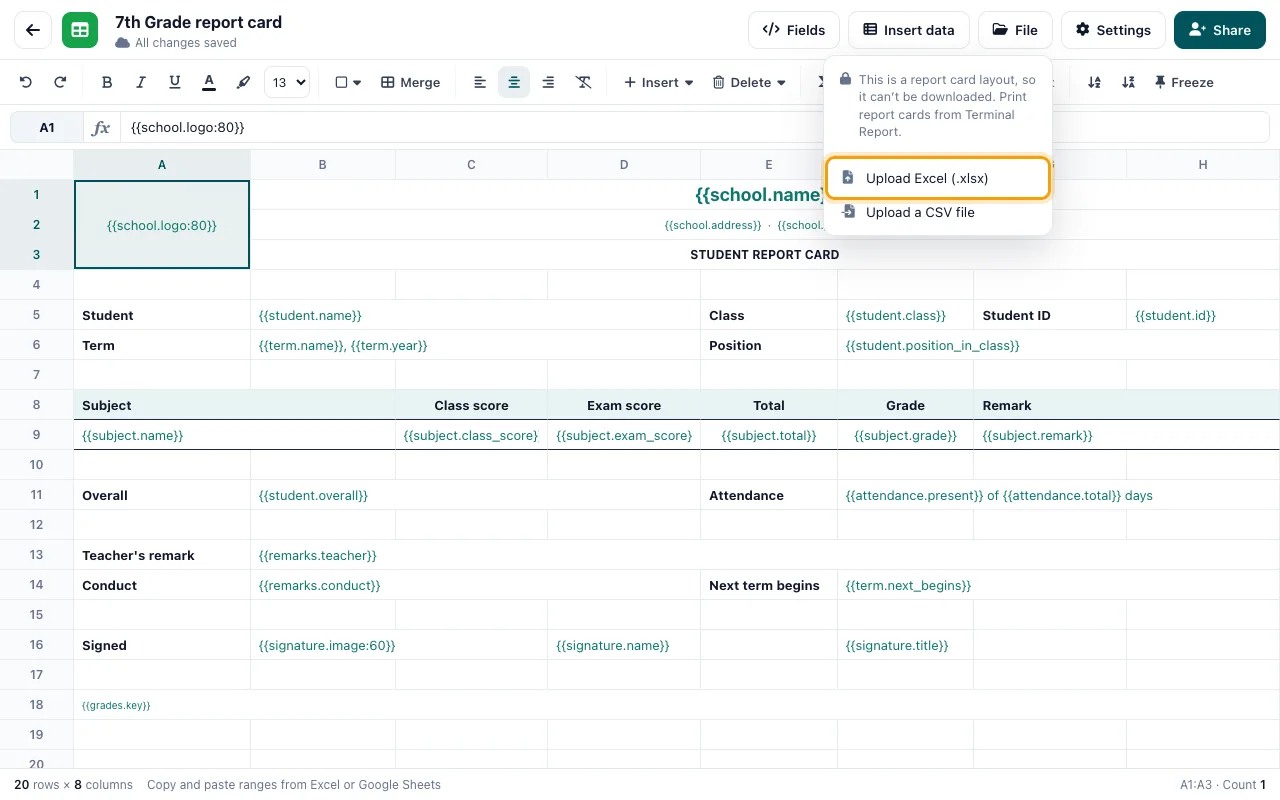
File, then Upload Excel (.xlsx). Choose the file. Its text, merged cells, fonts, fill colors, borders and column widths come across from the first sheet in the file.
Replace the sample names and numbers with fields, as shown below.
Good to know: You can also copy a range in Excel or Google Sheets and paste it straight into the sheet.
Add fields
Select the cell where a detail belongs.
Open Fields and click a field to put it in that cell. You can also type a field, or copy one with its copy button.
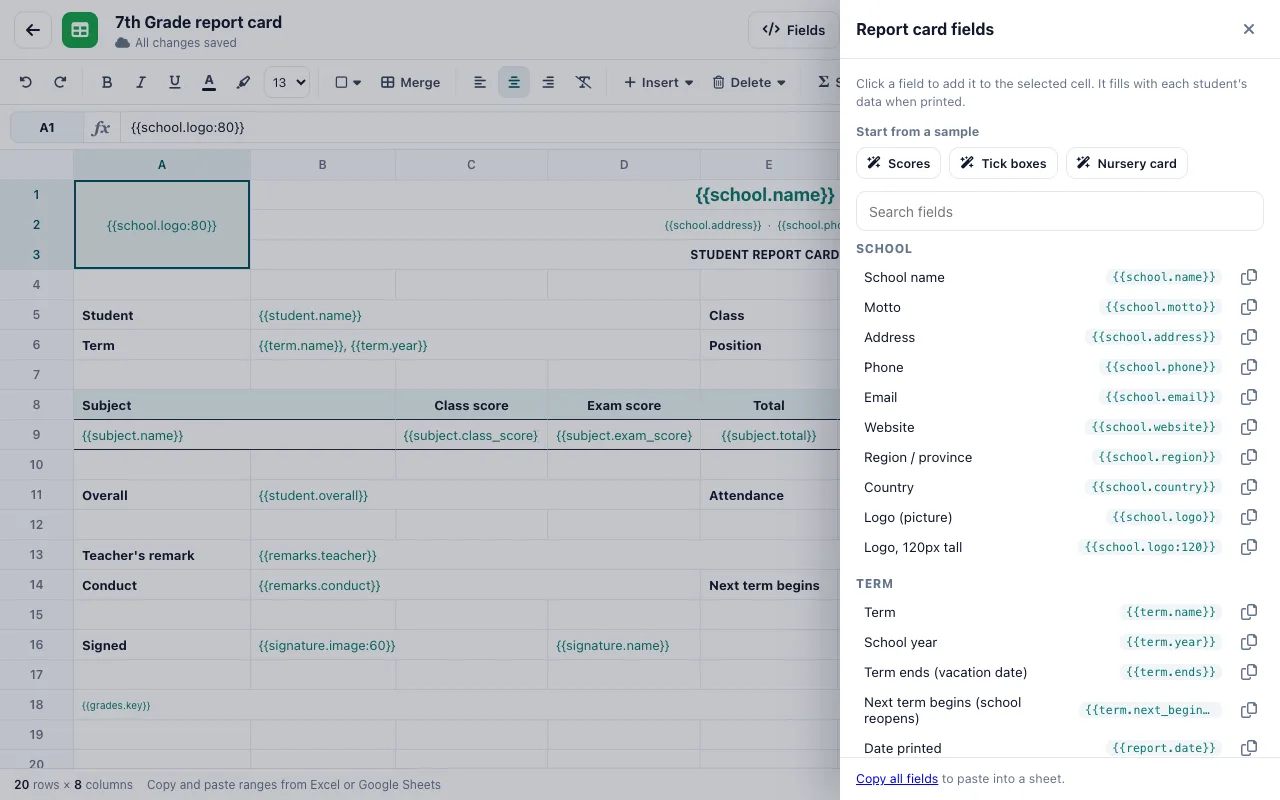
Fields: grouped by School, Term, Student, Results, Subjects and more, with a search box. For subjects, put the subject fields side by side in one row, under a row of headings. That one row repeats for each subject.
Fields you can use
The Fields panel lists every field; your school's own remark types appear there under Remarks. These are the ones schools use most.
Student and results
| Field | Prints |
|---|---|
{{student.name}} | Full name. Also first_name and last_name. |
{{student.id}}, {{student.class}} | Student ID and class. |
{{student.photo}} | The student's photo. |
{{student.position_in_class}} | Position, e.g. 12th / 18 students. Use student.position for just 12th. |
{{student.overall}} | Overall percentage and score, e.g. 78.00 % | 624.00 / 800.00. |
{{student.average}} | Average percentage. |
{{student.promoted_to}} | The class the student moves up to, when promotion is on. |
Subjects (the row repeats for each subject)
| Field | Prints |
|---|---|
{{subject.no}} | Row number: 1, 2, 3… |
{{subject.name}} | Subject name. |
{{subject.class_score}}, {{subject.exam_score}} | Class and exam scores. |
{{subject.total}}, {{subject.percentage}} | Total score and percentage. |
{{subject.grade}}, {{subject.position}} | Grade, and position in the subject. |
{{subject.remark}} | Remark, e.g. Excellent. |
{{subject.mark:Excellent}} | A ✓ when the remark or grade is Excellent. |
School, term and attendance
| Field | Prints |
|---|---|
{{school.name}}, {{school.motto}} | School name and motto. |
{{school.address}}, {{school.phone}} | Address and phone. |
{{school.logo}} | Your logo. |
{{term.name}}, {{term.year}} | Term and school year. |
{{term.next_begins}} | When school reopens. |
{{attendance.present}}, {{attendance.total}} | Days present, and days school was open. Also attendance.absent. |
Remarks, fees and signature
| Field | Prints |
|---|---|
{{remarks.teacher}} | The teacher's remark. Also conduct, attitude and interest. |
{{fees.outstanding}} | Balance due. Also total_billed and total_paid. Filled from PayGira when bills are set to show in Report Settings. |
{{signature.image}} | The signature from Report Settings. |
{{signature.name}}, {{signature.title}} | Who signed, and their title. |
{{grades.key}} | Your grading key, e.g. A (90 to 100) = Excellent. |
Examples
A score table
Headings in one row, and the subject fields in the row under it.
In your sheet
| Subject | Total | Grade | Remark |
|---|---|---|---|
{{subject. | {{subject. | {{subject. | {{subject. |
Prints
| Subject | Total | Grade | Remark |
|---|---|---|---|
| Mathematics | 92.00 | A | Excellent |
| Science | 85.00 | B | Very Good |
| Social Studies | 78.00 | C | Good |
Tick boxes
Put mark: and a remark or grade in each column. A ✓ appears in the column that matches the student's result.
In your sheet
| Subject | Excellent | Very Good |
|---|---|---|
{{subject. | {{subject. | {{subject. |
Prints
| Subject | Excellent | Very Good |
|---|---|---|
| Reading | ✓ | |
| Mathematics | ✓ |
Good to know: Add a column for each remark or grade you use. The word after mark: must match it; capital letters don't matter.
A sentence
{{student.first_name}} attended {{attendance.present}} of {{attendance.total}} days this term.Prints
Noah attended 58 of 61 days this term.
One subject in a fixed place
Put the subject's name in square brackets. The line doesn't repeat.
Mathematics: {{subject[Mathematics].total}} ({{subject[Mathematics].grade}})Prints
Mathematics: 92.00 (A)
Pictures at the size you want
Add a colon and a height in pixels to the logo, photo or signature.
{{school.logo:120}} {{student.photo:90}} {{signature.image:60}}Good to know: Without a size, the logo prints 80 pixels tall, a photo 90 and a signature 50.
Choice results
For assessments recorded as a choice (Yes / No, Pass / Fail), use the assessment's name after choice:. In the subject row, {{subject.choice:Practical}} prints that subject's result for Practical. {{choices.all}} lists every choice result in one line.
Use it for your classes
Open Settings. Under Report card, turn on Use as a report card.
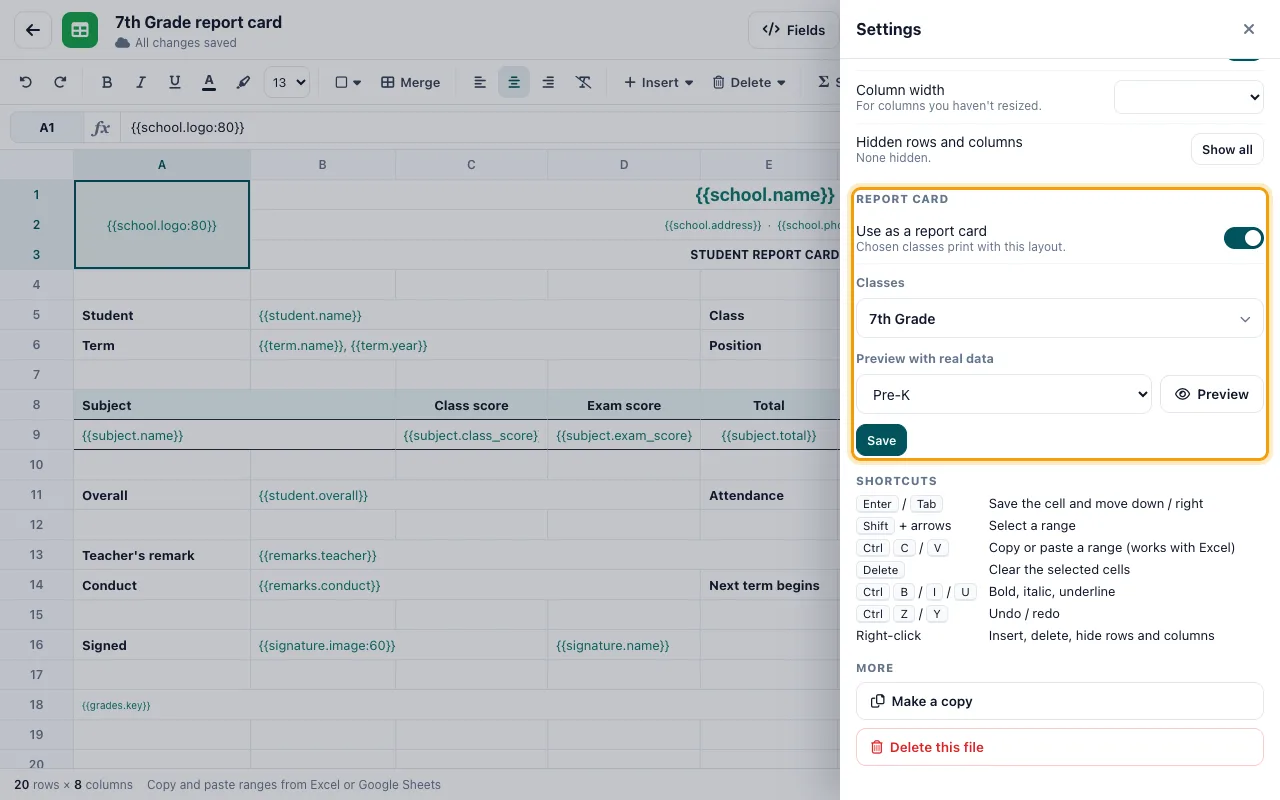
Settings, Report card: turn it on, choose the classes, then save. Under Classes, choose every class that should print with this layout, then select Save.
Good to know: Each class uses one template. Choosing a class here moves it from any other template, and classes without one keep the standard report card, so you can roll out a new layout one class at a time.
Preview and print
Under Preview with real data, choose a class and select Preview. The class's report cards open in a new tab.
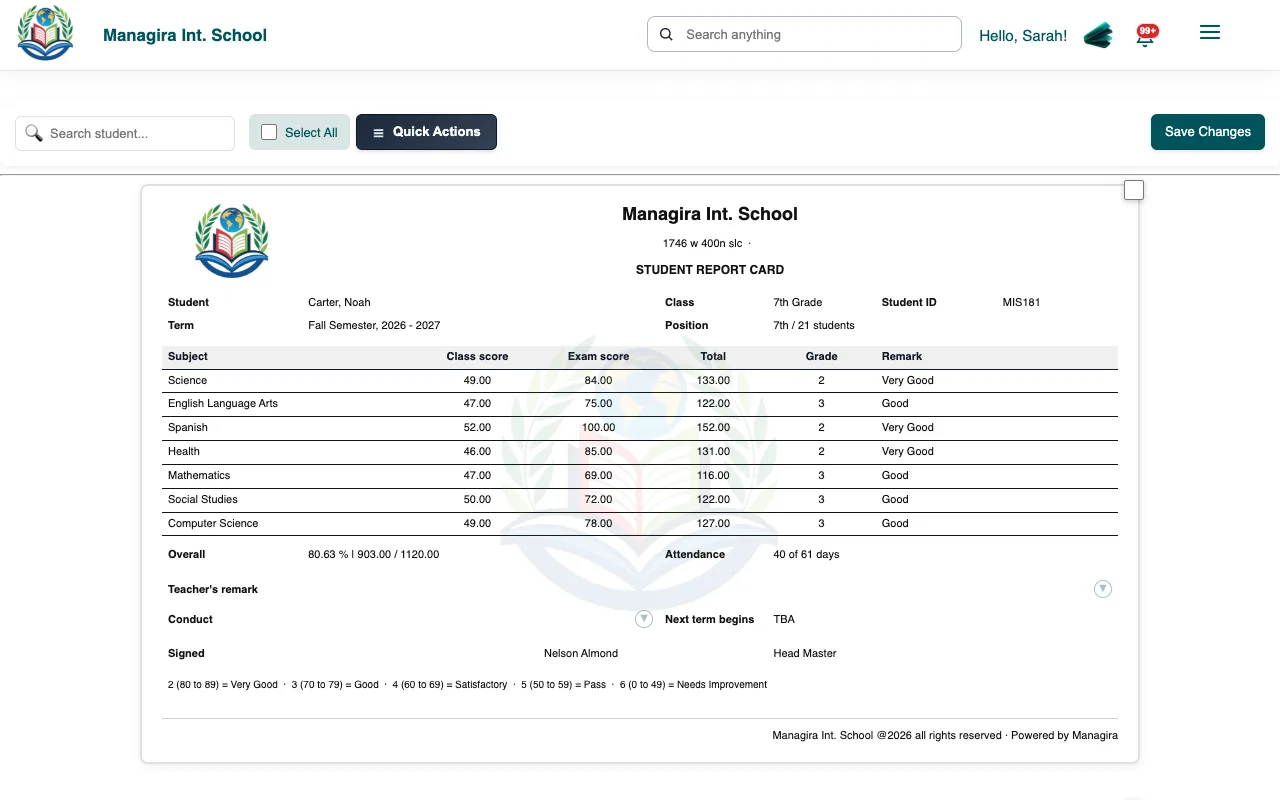
The preview: your layout filled in for each student, with a row for every subject. Adjust the sheet and preview again until it looks right.
Print as usual: open Reports, then Term Reports, then Terminal reports. The classes you chose print with your layout.
Frequently asked questions
A field prints blank.
Check the spelling between the braces, and that the student has that information this term. For example, remarks must be entered first, and fees show only when bills are set to show in Report Settings.
The subject row prints only once.
Make sure the row has a field that starts with subject., like {{subject.name}}. Fields for one named subject, like {{subject[Mathematics].total}}, stay in place on purpose.
Can each grade level have its own layout?
Yes. Make one template for each layout and choose its classes. Each class uses one template at a time.
Why can't I download the template?
A file used as a report card can't be downloaded. Print report cards from Terminal reports, or turn off Use as a report card to download the file.
Was this guide helpful?