
Custom editor: build your school's own forms
Build your own forms: permission slips, lunch counts, seating charts, behavior logs. Choose who fills them in, how often, and where the answers go.
Use the Custom editor for anything your school records about students that Managira has no place for yet. You make a section (a form), choose where it lives, and add its fields. The answers come back to one place.
Who can do this: Managers, and staff given the Custom Editor permission, build forms. Teachers, parents, students and drivers fill in the ones made for them.
Open the Custom editor
Open Management, then Custom editor.
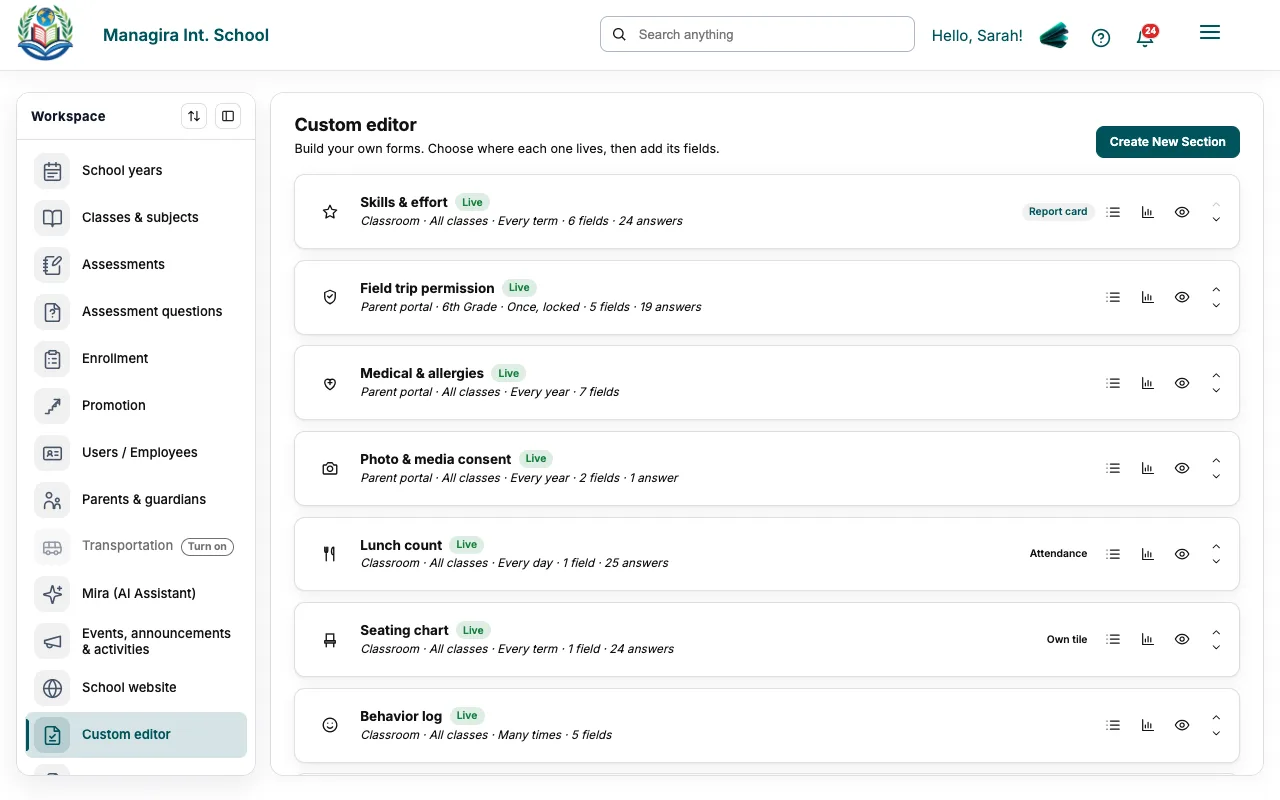
Management, Custom editor: your sections, one per row. Each row is one section: its name, where it lives, its classes, how often it's collected and how many fields it has.
Select a row to open it. On the right: Answers, Report, the eye to show or hide it, and arrows to move it.
Create a section
Select Create New Section.
Choose a ready school form, or Blank section.
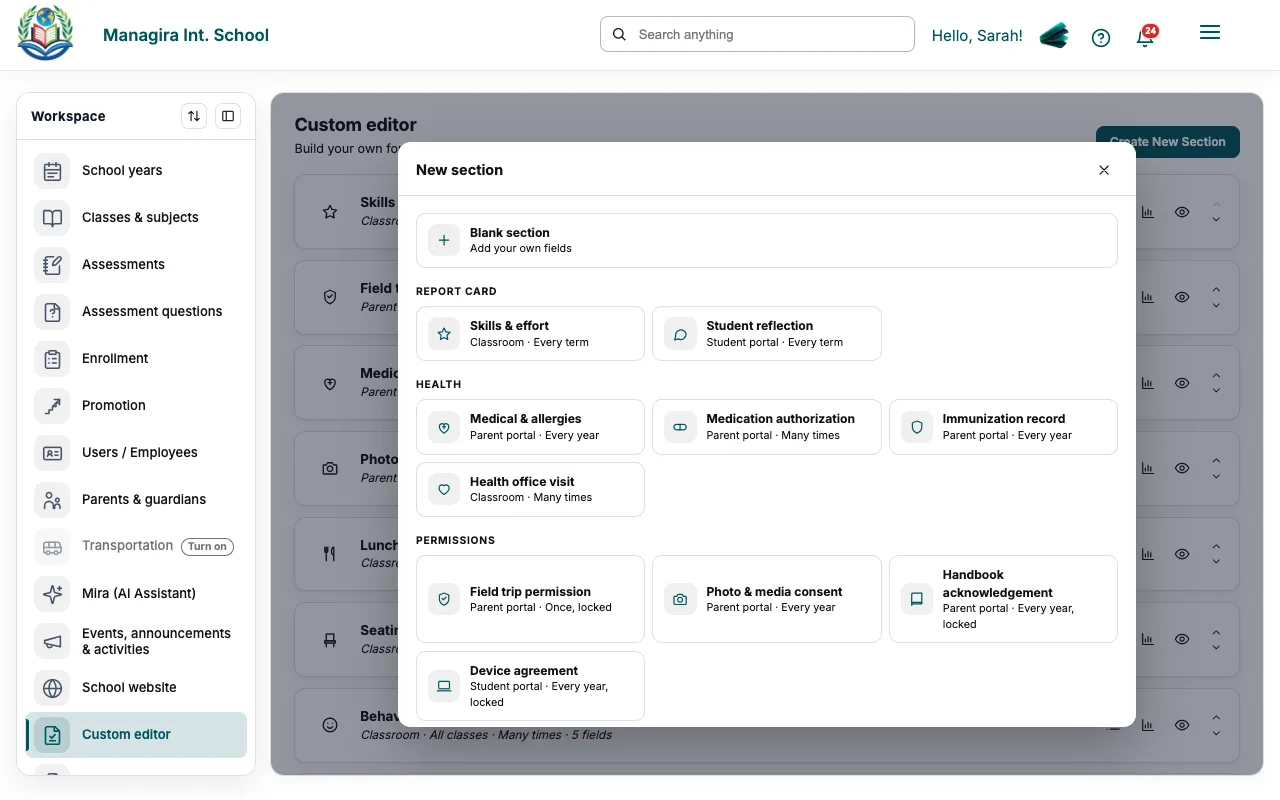
Start from a ready school form, or a blank section. Type its name.
Lives in: choose who fills it in.
Classes: All classes, or Choose classes.
Collect: Once, or Many times and then how often.
Select Save.
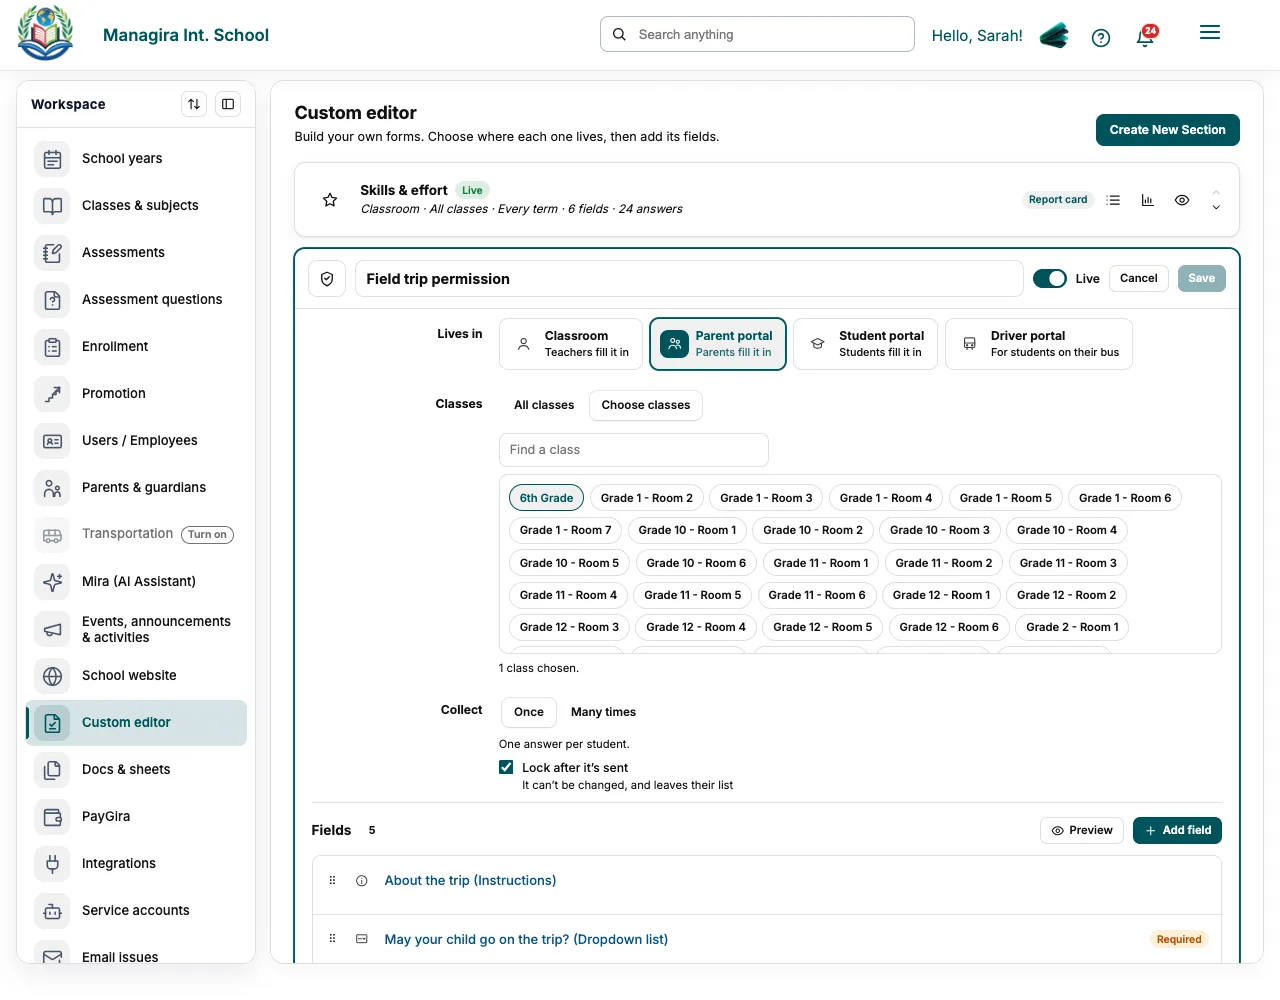
An open section: where it lives, its classes, how often it's collected, and its fields.
Lives in
| Lives in | Who fills it in | Where they find it |
|---|---|---|
| Classroom | Teachers and office staff | The class page, Forms tab |
| Parent portal | Parents | Their child's page, Forms tile |
| Student portal | Students | Their dashboard, Forms tile |
| Driver portal | Drivers, for students on their bus | The driver app, Forms card |
Collect
| Collect | What it means | Good for |
|---|---|---|
| Once | One answer per student. | Photo consent, medical details |
| Every day | One answer per student each day. | Lunch count |
| Every week | One answer per student each week. | Lunch orders, weekly check-ins |
| Every term | One answer per student, asked again each term. | Skills and effort, seating charts, groups |
| Every year | One answer per student, asked again each school year. | Handbook and device agreements |
| Any time | A list that grows: add an entry whenever something happens. | Behavior log, reading log, health office visits |
Tip: Tick Lock after it's sent for a form that must not change, such as a permission slip. Once sent it can't be edited, and it leaves the person's list.
Good to know: A new section is Live as soon as you save. Switch Live off to keep working on it in private; it shows as Hidden.
Add fields
In the open section, select Add field and choose a type.
Type the question. Add help text if it needs explaining.
Tick Required if it must be answered.
Select Add field. Drag fields to reorder them. Select one to change it.
| Type | Use it for |
|---|---|
| Text – single line, Text – multiple lines | Names, notes and explanations |
| Number, Date, Time | Amounts, dates and times |
| Yes / No | A simple yes or no. Show it as words, or as a tick and a cross. |
| Dropdown list | Pick one. Show it as a dropdown, as buttons with words, or as icons. |
| Checklist (pick several) | Pick all that apply |
| Rating (1–5) | A score from 1 to 5 |
| Email, Phone, Link | Contact details and web addresses |
| File upload | A photo or document, such as a doctor's note |
| Signature | The person types their name and ticks a box to sign |
| Seat (seating chart) | Where a student sits. Classroom sections only. It turns the section into a seating chart, with each student's photo and name, or names only. |
| Instructions | Text to read. Nothing to answer. |
Show a field only when it's needed
Select the field, then open More options.
Under Show this field, choose Show or Hide, the other field to watch, and the answer.
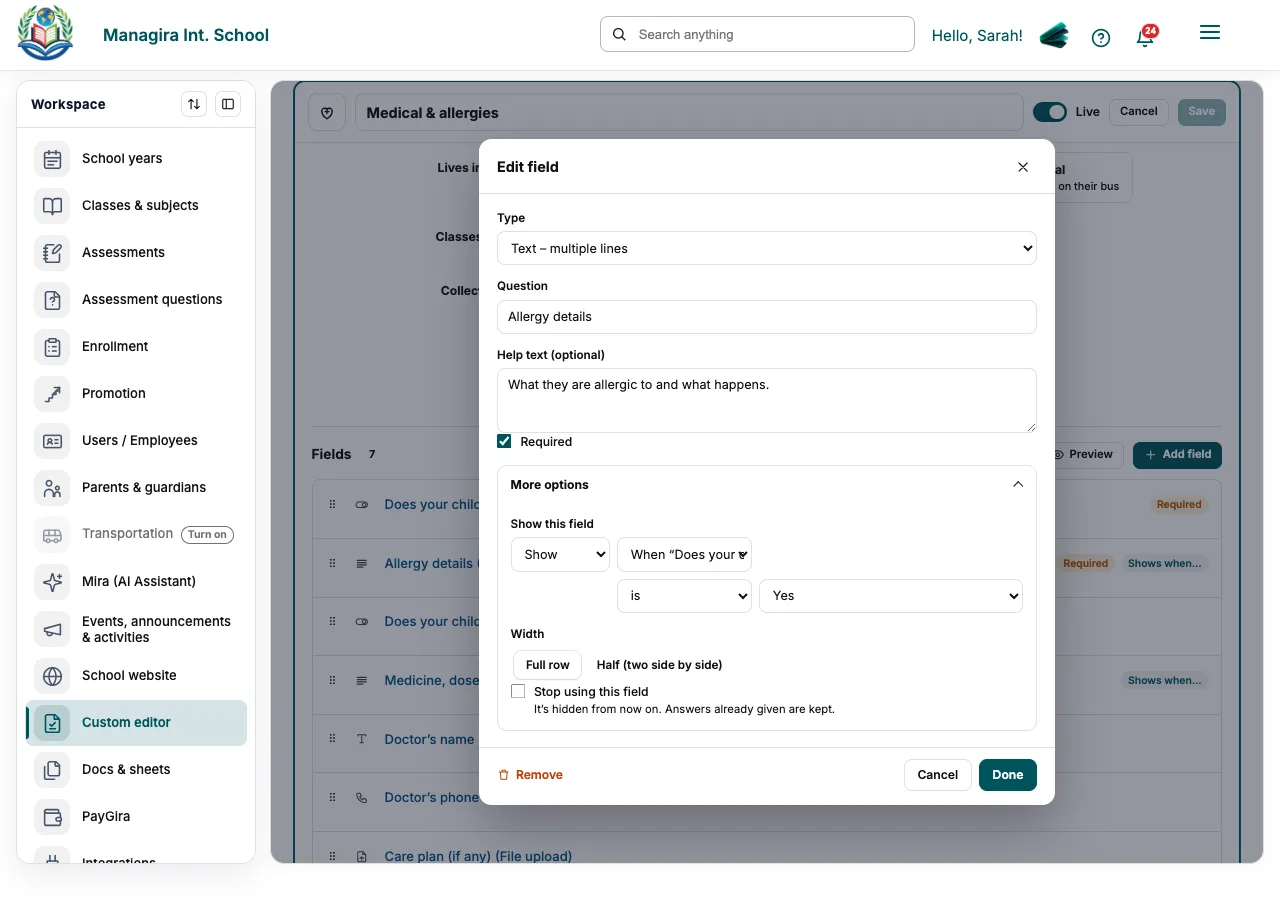
A field that shows only when another answer calls for it. Select Done, then Save.
- Width: Half puts two short fields side by side.
- Stop using this field: hides it from now on. Answers already given are kept.
Example: Show Which medication? only when Does your child take medication? is Yes.
More options for a section
Open More options at the bottom of a section. You only see the ones that fit where it lives.
| Option | What it does |
|---|---|
| Deadline | Parent and student forms. The due date shows on the form. |
| Required | Marks the form required. Families who haven't filled it in are reminded once, 2 days before the deadline. |
| Tell families by | Parent forms. Families always get a notification. Tick Email to email them too. Text message and WhatsApp show when your school has them switched on in Integrations. Used when the form goes live and when you send a reminder. |
| When it's sent, tell | Who gets a notification each time someone sends the form: the class's main teacher, the people who build forms, or both. |
| Who sees the answers | The class's teachers always do. Tick Parents or Students to share a classroom or driver section with them. Tick Keep it from teachers for sensitive records, such as support plans: then only people who build forms can open it. |
| Attendance | Classroom sections collected every day. Adds the section as a column on the attendance page. |
| Report card | Prints each student's answers for the term on their report card. |
| Its own tile | Gives the section its own place, by name: an item in Class Tools, a tile on the child's page or the student's dashboard, or a card on the driver's page. Without it, the section sits under Forms. |
| Notes | A note for the people who build forms. |
Ready-made school forms
Each one opens with its fields ready. Change anything before you save.
| Group | Forms |
|---|---|
| Report card | Skills & effort, Student reflection |
| Health | Medical & allergies, Medication authorization, Immunization record, Health office visit |
| Permissions | Field trip permission, Photo & media consent, Handbook acknowledgement, Device agreement |
| Requests from parents | Absence note, Early dismissal request, Meeting request |
| Every day in class | Lunch count, Seating chart, Student groups, Lunch order |
| Classroom records | Behavior log, Reading log, Support plan |
| Sign-ups & surveys | Club & sports sign-up, Volunteer sign-up, Family survey |
Good to know: Managira already keeps emergency and pickup details, attendance, driver reports and report card remarks (Report Settings). Use those; the library leaves them out so nothing is recorded twice.
Fill in a form in the classroom
Open the class, then Forms in Class Tools.
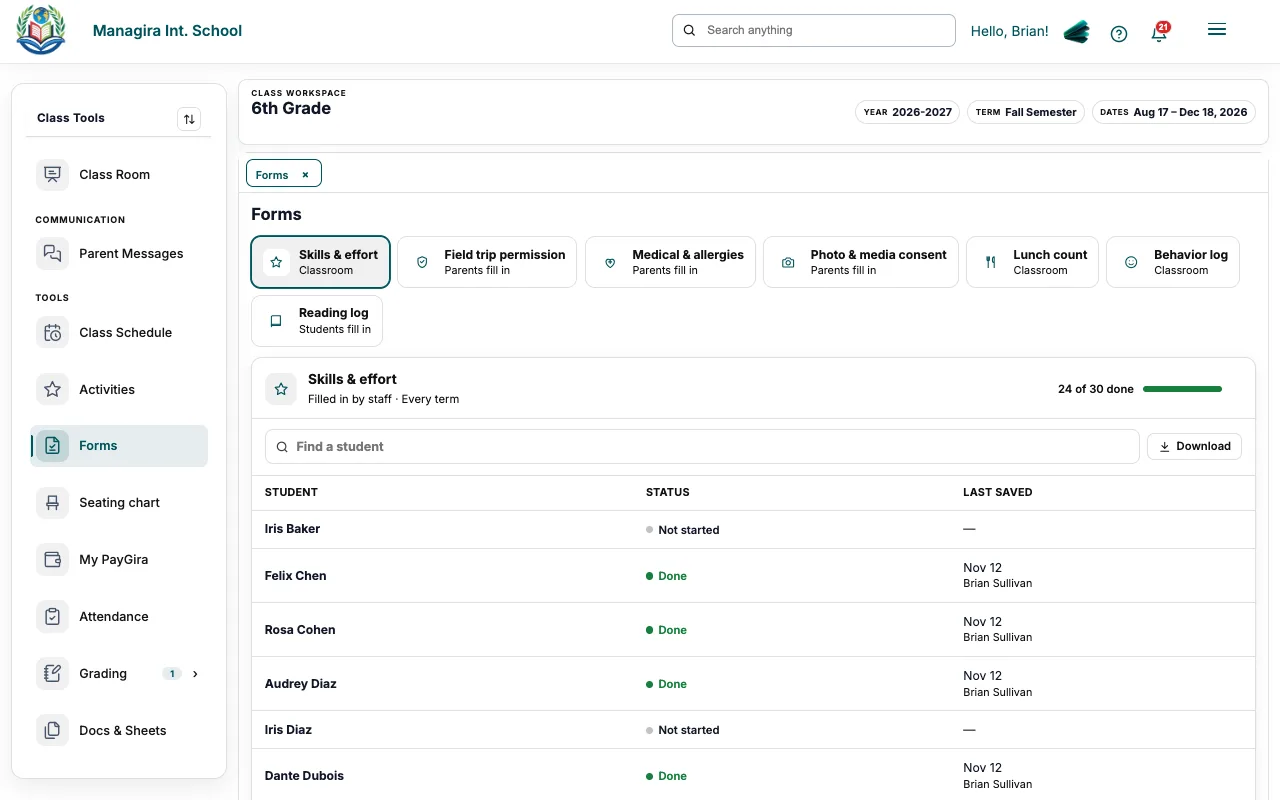
The class page, Forms tab: each student and whether the form is done. Choose a form. Each student shows Done, Waiting or Not started.
Select a student, fill in the fields, and select Save.
- Many times sections keep a list: add a new entry each time.
- Every term and Every year sections start from the student's last answers, so you only change what's different.
- A parent handed the form in on paper? Open the student and select Received on paper? Fill it in.
Good to know: Teachers see the forms for their own classes. They read what parents and students send, but can't change it.
Lunch counts, seating charts and groups
A section made only of tap-to-answer fields (Yes / No, dropdown, rating, seat) is quick: teachers answer for the whole class on one screen, with no window to open. The editor tells you when a section is quick.
- Icons or words: in the field, choose Show as, Icons. Each choice gets an icon picked from its words (a fork and knife for School lunch, a bag for Packed lunch). Select an icon to change it, or choose Words only.
- One tap: the answer you tap lights up and the others fade. Tap it again to clear it.
- A count: a key above the list shows each answer and how many students have it, so the lunch count is ready for the kitchen.
A lunch count, taken with attendance
Create a section from Lunch count in the library (Classroom, Every day).
In More options, keep Add it to the attendance page ticked.
Teachers take attendance as usual and tap each student's lunch in the column beside the name. The tapped icon lights up and saves at once; the heading counts each lunch.
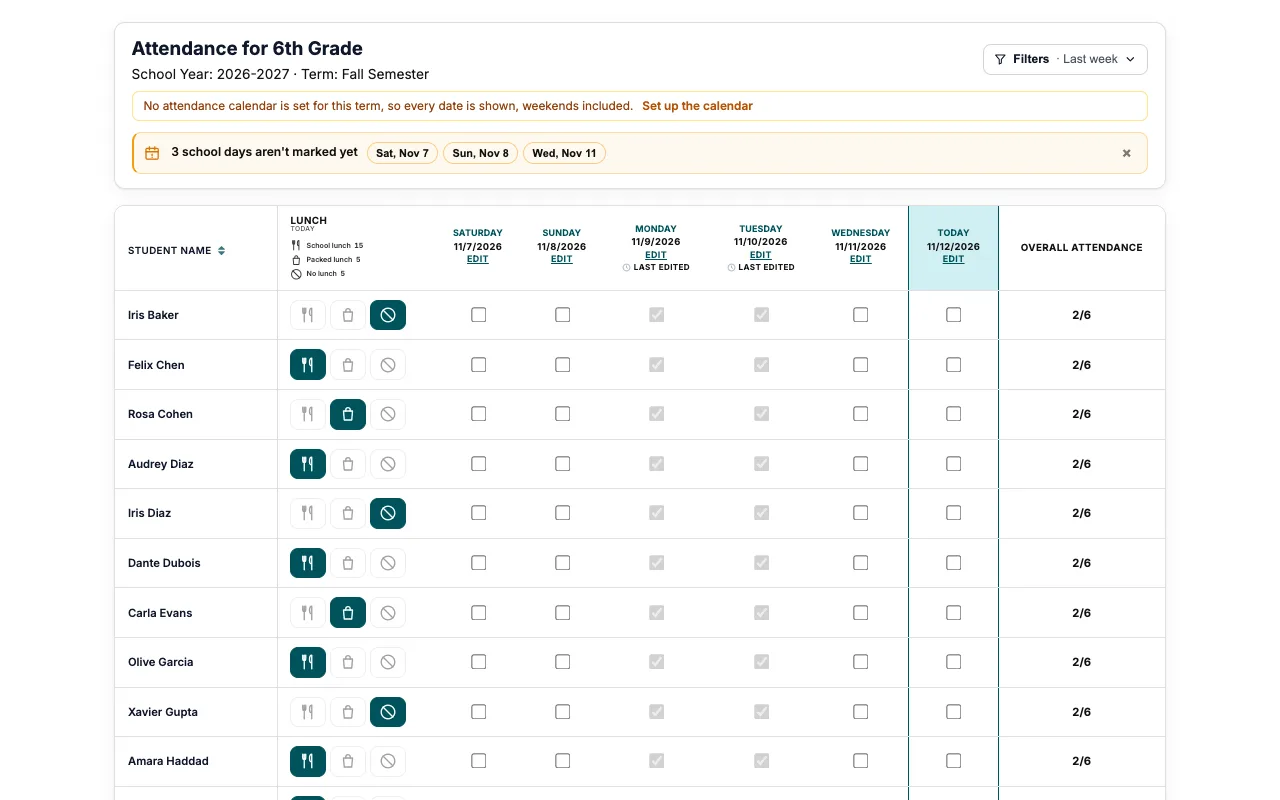
The attendance page with a Lunch column for today.
Tip: Prefer parents to choose? Use Lunch order: it lives in the parent portal and comes back every week.
A seating chart
Create a section from Seating chart in the library. It has one field, of the type Seat.
In the class, open Seating chart in Class Tools. Each student shows with their photo, or their initials. Tap a student, then tap a seat.
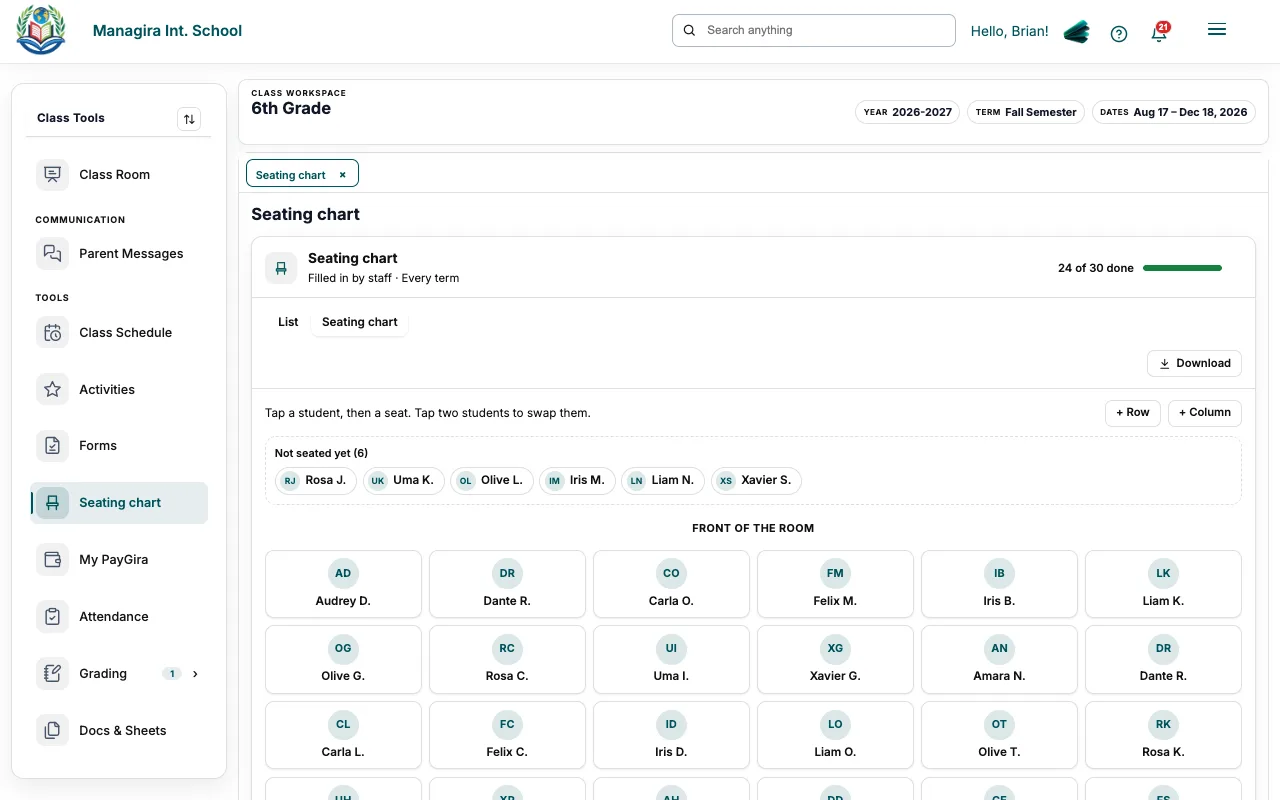
A seating chart: the front of the room at the top. Tap two seated students to swap them. + Row and + Column make the room bigger.
Student groups
Create a section from Student groups in the library and rename the groups (reading groups, project teams, houses).
In the class, open the form and choose Groups. Tap a student, then the group to move them to.
Good to know: Any quick section with a dropdown can be shown as groups, and its List lets you answer for each student in the row.
Forms for parents, students and drivers
- Parents open their child's page and select Forms. See Forms and your child's portfolio.
- Students select Forms on their dashboard.
- Drivers find a Forms card in the driver app, for the students on their bus only.
Good to know: When a parent form goes live, its families get a notification. Tick Email them too before you save to send an email as well.
Read the answers
In the Custom editor, open the section and select Answers.
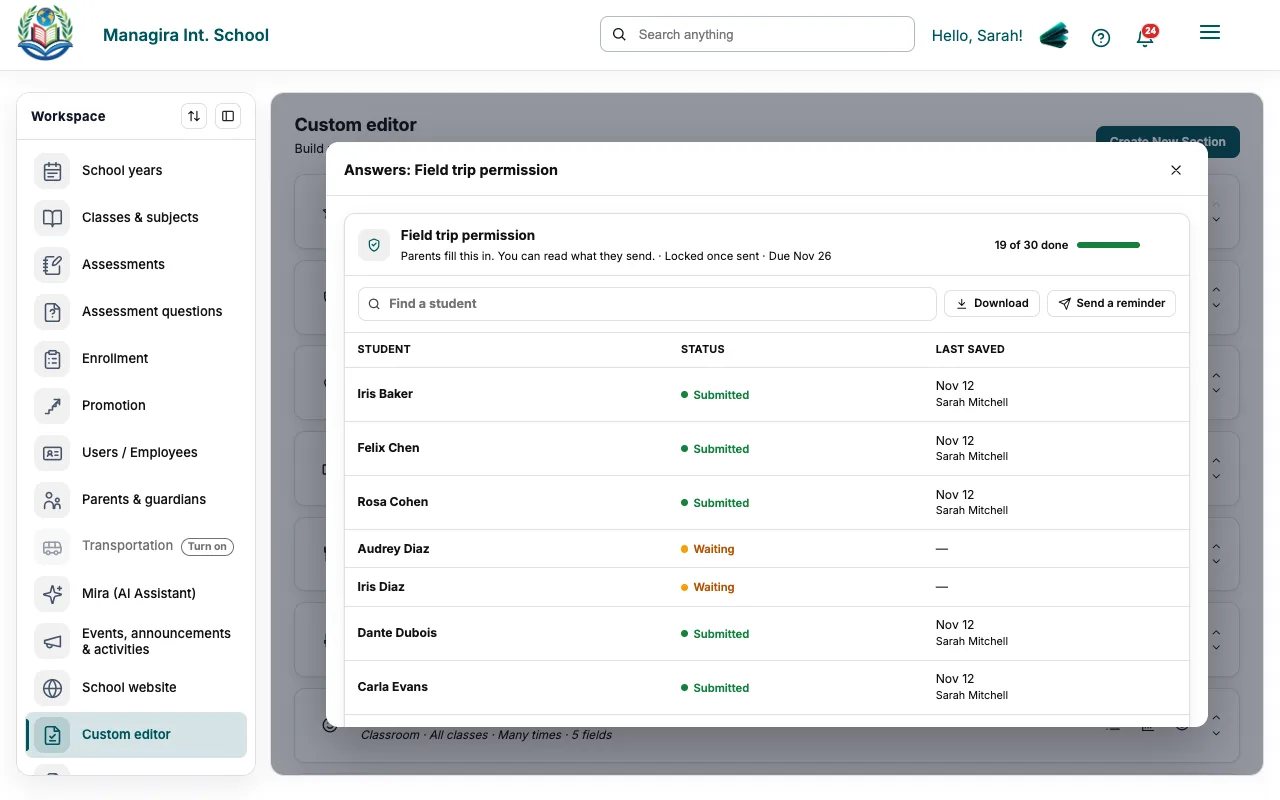
Answers: who has filled it in, with Download and Send a reminder. Select a student to read what was sent.
Download saves a spreadsheet (CSV): one row per answer with its day, and students who haven't answered marked Not yet.
Report opens Report Builder on this form, with its fields already chosen as columns.
Send a reminder (parent forms) sends a notification and an email to families who haven't filled it in. A family is reminded once a day at most.
Good to know: The class's main teacher gets a notification each time a parent, student or driver sends a form. Change who hears under More options, When it's sent, tell.
Print answers on report cards
Use this for things like effort, behavior, work habits or skills that you grade every term.
Create a section that lives in Classroom and is collected Every term. Skills & effort in the library is ready-made.
Open More options and tick Show on report cards. Save.
Teachers fill it in for each student on the class page, Forms tab.
Generate report cards as usual. Each student's answers for that term print under the section's name.
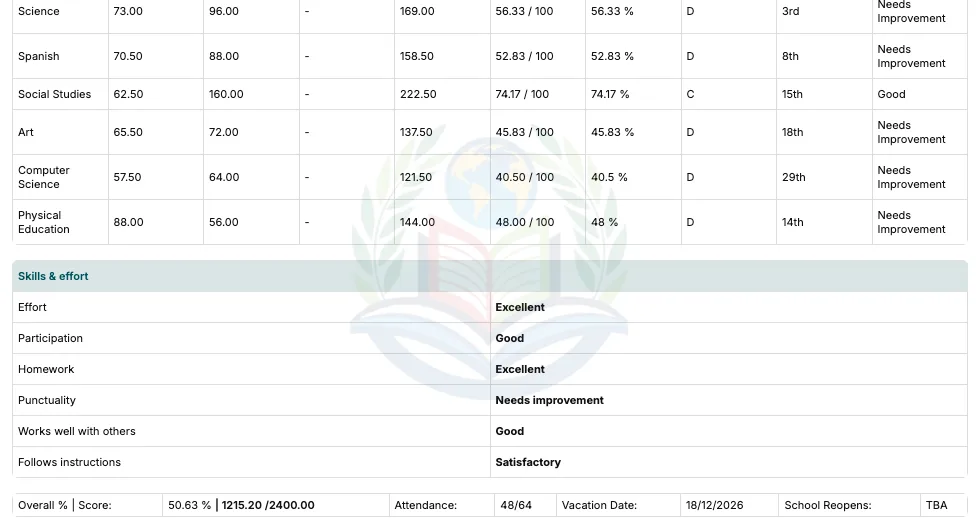
A report card with a Skills & effort section from the Custom editor.
- To leave them off: open Reports, Report Settings, Advanced, and untick Custom editor sections.
- On your own report card template, add the field
{{forms.all}}where the answers should print.
Report on answers in Report Builder
The quick way: in the Custom editor, select Report on the section. Report Builder opens on that form with its fields as columns. Select Run.
Or open Reports, Report Builder, choose Students, then Custom forms.
Filter by Form, class, term or day.
Choose columns. Every field of your forms is a column, listed under its form's name.
Run it. Save, share or export it like any other report. See Report Builder.
Frequently asked questions
How is this different from the fields in Admission Settings?
Admission Settings adds details to the student's or parent's own record, asked when they join. The Custom editor is for forms you collect later, by class, term or event, each with its own list of answers.
Can I change a form after people have answered?
Yes. Add or reword fields at any time. To retire a field, use Stop using this field: it is hidden from now on and the answers already given are kept.
A parent can't see a form.
Check the section is Live, lives in Parent portal, and includes their child's class. A locked form leaves the list once it has been sent.
Who can see the answers?
People who build forms see every answer. Teachers see their own classes, and drivers their own riders. Parents and students see what they sent, and what you choose to share. A protected section opens only for people who build forms.
Does a new term clear the answers?
No. An Every term section starts a fresh answer each term. Earlier terms keep theirs, and you can still download or report on them. The same is true of each day and each week.
Can parents and teachers both fill in the same form?
A form lives in one place. For a parent form, a teacher can enter an answer that came on paper. For a lunch count, choose Lunch count for teachers or Lunch order for parents.
Why don't I see Text message or WhatsApp?
They show only when your school has that channel switched on in Settings, Integrations. Email and notifications are always there.
What happens when I remove a section?
Its answers are removed with it. To keep the answers, switch Live off instead: the section is hidden and nothing is lost.
How many forms can a school have?
Up to 200 sections, each with up to 80 fields.
Was this guide helpful?